Home-Installation
Installation
GENERAL INFORMATION
Produced during the latest technology, AShionOuRun proudcts are among the finest quality products available in the world today. These quality products should be installed under optimal circumstances in order to guarantee a perfect finish.
IMPORTANT
AShionOuRun mouldings should be stored and installed in dry rooms with a normal surrounding temperature.
Certain activities such as f.e. plastering, steaming off wallpaper and painting of the interior with acrylic paint, will considerably increase the humidity of the place for a certain time. Do not store or install mouldings under these circumstances. Also avoid a humid or wet substrate for installing. Too high humidity can influence the dimensional stability of polyurethane products. Avoid also high differences in temperature between storage and installation. Optimal are normal room temperatures. It is recommended to stabilize the glue mouldings for 24 hours in the place of installation.
Tools: miter box, fine tooth saw, caulk gun, tape measure, sponge, fine-grit sandpaper, pencil, air nailer, hammer, adhesive and filler, and more.
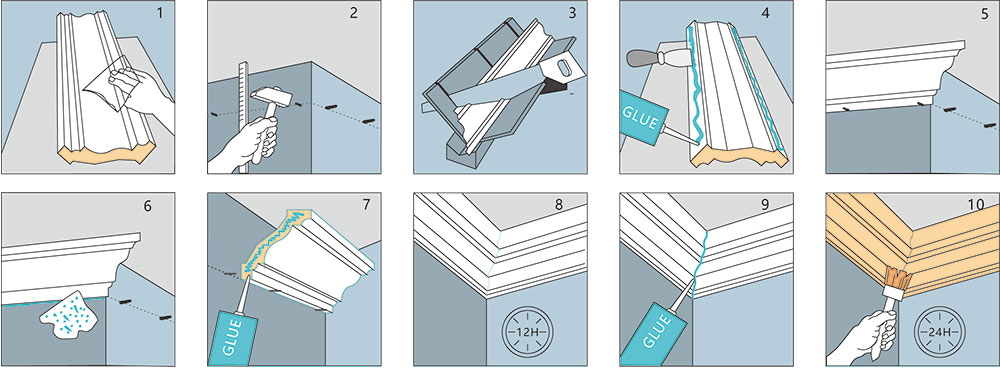
(1) Preparation Before installing the product, wipe the material gently to avoid any dirt and impurities. This is important for good adhesion and a smooth finish. Measure exactly where you want to install your moldings and calculate the length you need to install to compensate for miter waste. Take a length of line and place it flush with the ceiling and wall as you want it to be installed.
(2) Draw positioning lines on the ceiling and walls, illustrating the edges of the lines, onto which nails can be driven to hold the lines in place.
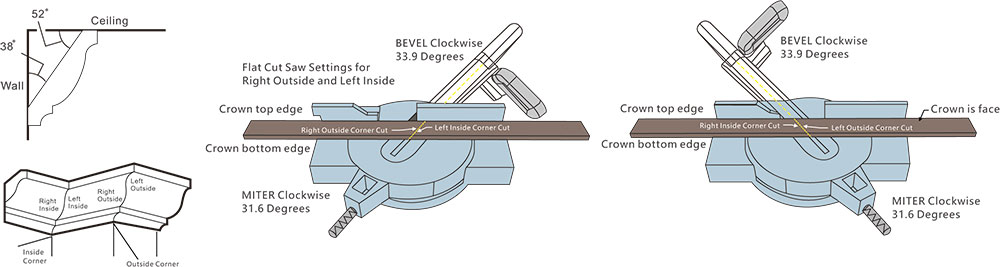
(3) Bevel miter tool can be used for sawing all product shapes. Place lines in miter boxes, walls and ceilings. For right-hand outside corners, use the left slot to save material to fit to the left side of the cutout. For left hand outside corners, use the right slot, saving material to fit into the right side of the cutout. For right-hand inside corners, use the right slot, saving material to fit to the left side of the cut. For left hand inside corners, use the left slot, save material to fit into the right side of the cut, use the center slot to cut the butt joint, use the tool correctly.
(4) Install against the wall and ceiling using glue and a caulking gun, and apply glue on the line glue layer that will be installed on the wall and ceiling.
(5) Place the line inside the fixed line and fix it with air nails or steel nails.
(6) Spilled glue can be removed immediately with a damp cloth or sponge while filling the final gap between the line and the ceiling or between the line and the wall.
(7) Lines continue the full length of each other and around the room. Glue should be applied to one side of each joint before installing the next line, the lines will be held very firmly, this will guarantee a perfect connection between adjacent lines.
(8) Remove excess adhesive after the glue has hardened (depending on relative humidity), if immediate adhesive removal is required, use acetone.
(9) After finishing the installation lines, final gaps and miter cuts can be filled with glue.
(10) After the glue hardens, the overflowing glue can be cleaned up, the line butt joints can be smoothed with sandpaper, and then painted or sprayed with high-quality paint.